Example Box: Brain Extraction
Introduction
The aim of this example is to become familiar with the brain extraction process and how to evaluate the outputs.
This example is based on tools available in FSL, and the file names and instructions are specific to FSL. However, similar analyses can be performed using other neuroimaging software packages.
Please download the dataset for this example here:
Data download
The dataset you downloaded contains three images:
- Original (non-brain-extracted) structural image:
T1.nii.gz - Two brain extracted images:
T1_v1_brain.nii.gzandT1_v2_brain.nii.gz
Viewing the Data
To start with load the original image into a viewer (e.g. fsleyes) and inspect the image. Then load the first brain extracted image (T1_v1_brain.nii.gz). To examine the quality of the brain extraction you can either flick between the brain-extracted and non-brain-extracted images (in fsleyes or fslview it is best if you place the brain extracted image at the bottom of the image list for this).
Alternatively, you can change the colour of the brain extracted image and view it on top of the grayscale original image (for this it is necessary to have the original image at the bottom of the image list in fsleyes or fslview). In addition, reducing the opacity of the brain extracted image then allows you to more easily see what is and is not part of the brain extraction. This is often the best way to see the brain extraction results as you can easily see both sorts of errors: inclusion of non-brain tissue and exclusion of brain tissue at the edges.
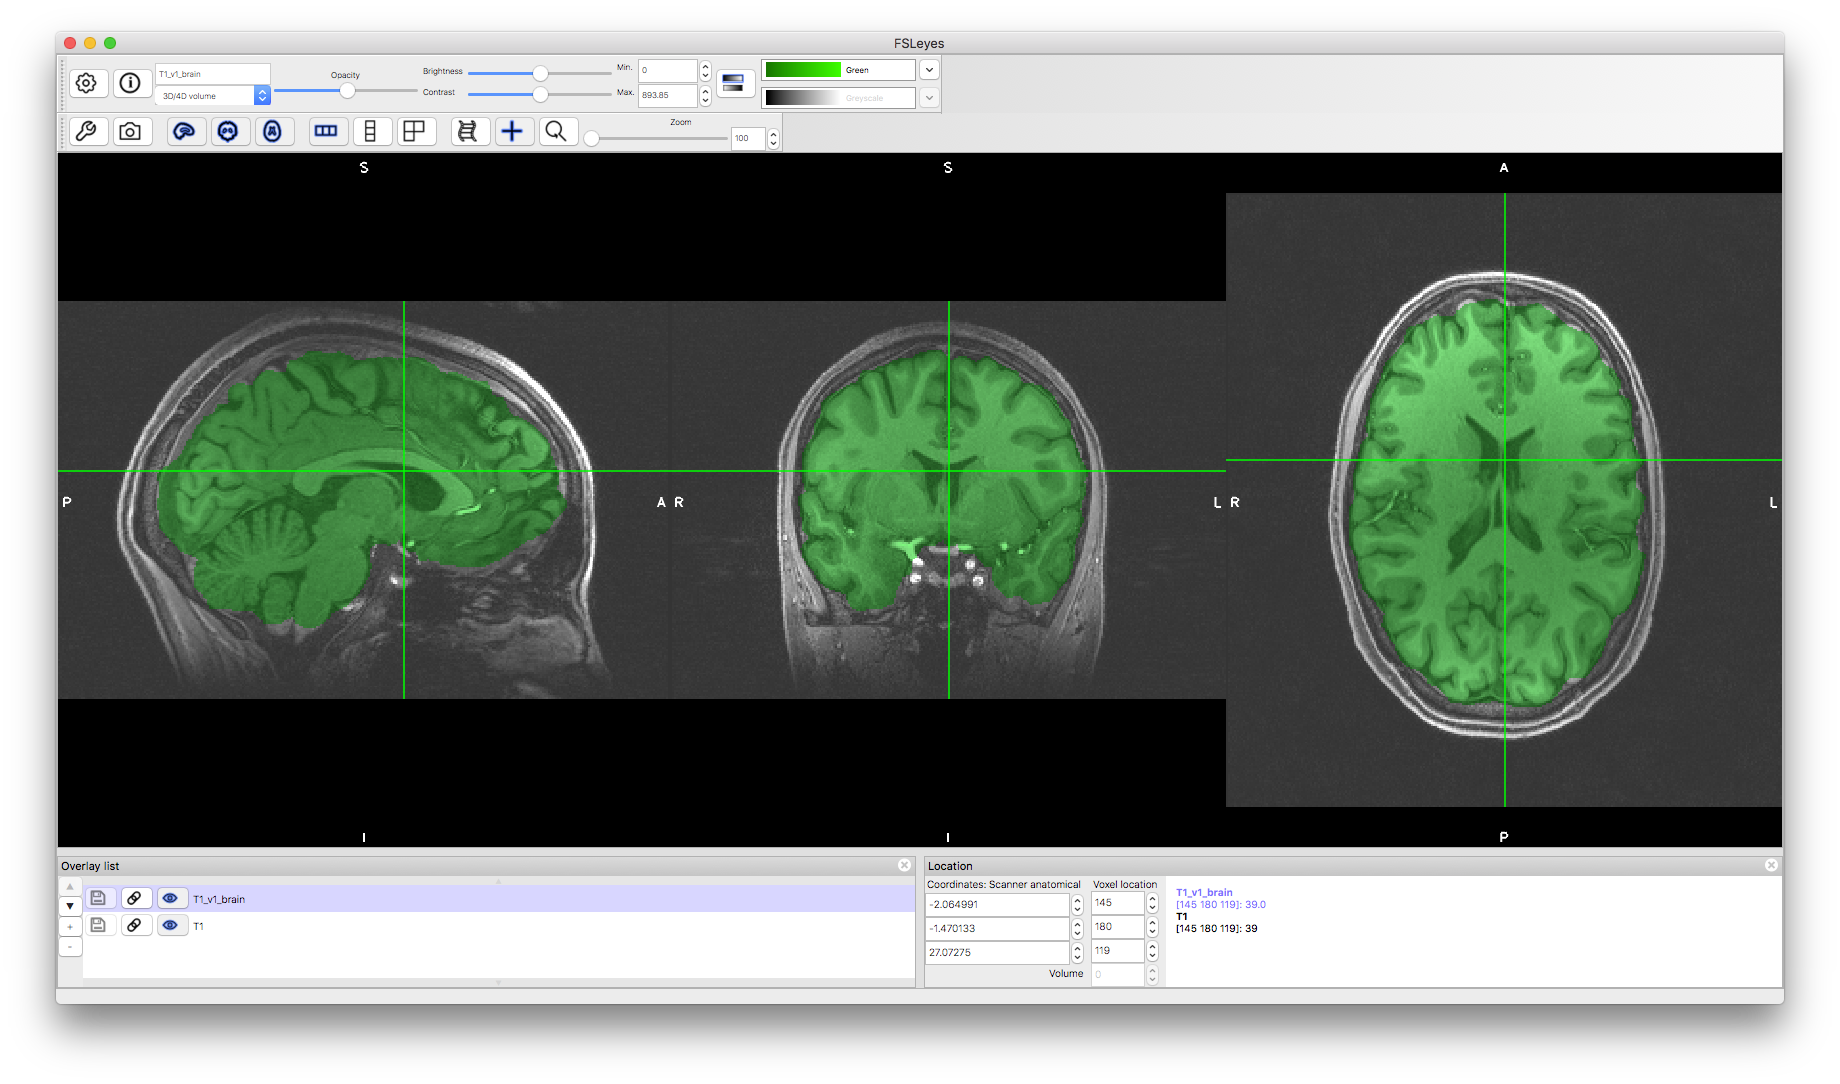
Load the second brain extracted image and use a different colour to compare both brain extraction results. Try to determine which one looks more accurate to you. Look for both areas where brain tissue has been excluded and areas where non-brain tissues are included. Typically it is worse to exclude brain tissue than to include some non-brain tissue, though the required accuracy of brain extraction depends on how the results will be used (e.g., for registration a number of small inaccuracies are acceptable, whereas for tissue quantification more accurate results are required - see the main Primer text).
Which of the versions is better? Click here to see some comments.
Running Brain Extraction (with FSL)
Now let's perform a brain extraction using the original image. For this we will describe how to do this with the FSL tool named BET (Brain Extraction Tool) but other tools (within FSL or other packages) could also be used.
Start the BET GUI by opening up a terminal window and typing fsl and pressing return. This will bring up the set of FSL GUIs as a menu, and from this list click on BET. You should then see the BET GUI start as a separate window.
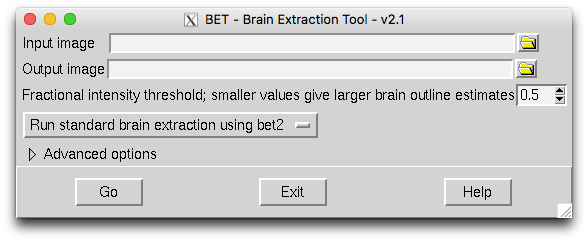
To use this all you need to do is to select the input image name via the file browser icon (top right) and nce you have done this it will give the output a default name (T1_brain.nii.gz in this case) and then you can just hit "Go". This will run the brain extraction with the default options. Try that and see how it compares to the other outputs above. You can tell when it has completed the brain extraction as the "Go" button returns to normal, but you can also check the terminal window (which will print up "Finished") or just check for when the output file (a nifti nii.gz image) appears.
Exploring parameter settings
The most fundamental parameter to vary for FSL's BET is the "fraction intensity threshold" which is set to 0.5 by default. Making this value smaller will result in the brain extraction boundary going outwards (a larger brain estimate) and making the value larger will result in the boundary going inwards (a smaller brain estimate). Try changing this in the GUI and re-running it with a different setting (save the result with a different output name).
If you click on the triangle next to "Advanced options" you will make a range of other options available. The most useful parameters to change here are the "Threshold gradient" or the "Coordinates for the centre". Try some different values for these: generally stick to between -1 and +1 for the gradient threshold and set the centre based on the voxel coordinates that are reported in the viewer when you click on a voxel at the centre of the brain. See what differences these make. In this particular instance they are probably not necessary, but they can be very useful for other images. Feel free to try it on some other structural images (e.g., some of the ones from the dataset of the first example box).

From these examples you should now be able to view brain extraction results, evaluate the quality of the extraction, run the BET tool in FSL and vary some of the key parameters to improve your brain extraction. Note that areas such as the sagittal sinus and meninges are almost always included in the brain extraction result. More sophisticated methods (such as cortical surface modelling) are usually necessary to remove these structures.